Water Balloon Luminaries (via Candletech)
What You’ll Need:
High Melt Paraffin Wax (IGI 1260)
Water Balloons
Double Boiler
Cookie Sheet
Instructions:
1. Fill a water balloon with tepid water.
2. Melt your wax. Optimum working temperature for this project is 180 degrees Fahrenheit. Try to maintain this temperature for your wax while working by keeping it on a double boiler.
3. Slowly dip your balloon into the wax to just below the water level in the balloon. Warning: Do not dip the balloon into the wax past the water level. This could cause the balloon to pop.
4. Hold the balloon in the wax for a few seconds, and then slowly lift it out of the wax. Dip the balloon a few more times, allowing some time between dips to let the wax cool.
5. While it is still quite warm, carefully set the balloon down onto a piece of paper or a cookie sheet, making sure it is level. This will create a flat bottom for the luminary.
6. Dip your balloon a few more times until it is the desired thickness. A good target thickness is 1/4 to 1/2 of an inch.
7. Set the balloon on the paper or cookie sheet again and let it cool.
8. When the wax is completely cooled, hold the balloon over a sink or bucket, facing away from you. Carefully pop the balloon with a skewer or knife and let the water drain out. Throw away the balloon shards.
9. To level the top of the luminary, heat a cookie sheet on the stove and place the luminary top-down onto the hot sheet and carefully melt the edges until it is level.
10. Place a tea light or votive candle inside the luminary and burn on a candle holder in a dark area.
DIY: Water Balloon Luminaries
Water Balloon Luminaries (via Candletech)
What You’ll Need:
High Melt Paraffin Wax (IGI 1260)
Water Balloons
Double Boiler
Cookie Sheet
Instructions:
1. Fill a water balloon with tepid water.
2. Melt your wax. Optimum working temperature for this project is 180 degrees Fahrenheit. Try to maintain this temperature for your wax while working by keeping it on a double boiler.
3. Slowly dip your balloon into the wax to just below the water level in the balloon. Warning: Do not dip the balloon into the wax past the water level. This could cause the balloon to pop.
4. Hold the balloon in the wax for a few seconds, and then slowly lift it out of the wax. Dip the balloon a few more times, allowing some time between dips to let the wax cool.
5. While it is still quite warm, carefully set the balloon down onto a piece of paper or a cookie sheet, making sure it is level. This will create a flat bottom for the luminary.
6. Dip your balloon a few more times until it is the desired thickness. A good target thickness is 1/4 to 1/2 of an inch.
7. Set the balloon on the paper or cookie sheet again and let it cool.
8. When the wax is completely cooled, hold the balloon over a sink or bucket, facing away from you. Carefully pop the balloon with a skewer or knife and let the water drain out. Throw away the balloon shards.
9. To level the top of the luminary, heat a cookie sheet on the stove and place the luminary top-down onto the hot sheet and carefully melt the edges until it is level.
10. Place a tea light or votive candle inside the luminary and burn on a candle holder in a dark area.
THE NEW YEARS BRIDE
Tomorrow we'll be doing some heavier reflecting on the New Years Bride--past and present. But today I wanted to wish luck to those of you saying 'Ido' either tonight or tomorrow. If you're still up-in- the-air about accessorizing your look, here are a few great ideas . . .
STYLE YOUR DREAM WEDDING
With the exception of my six-pound Chihuahua, this has to be the best Christmas gift I ever got and believe me it was read front to cover in one sitting. Lifestyle expert Susie Coleho has reached the pinnacle of wedding style with her book, Style Your Dream Wedding. From the high quality paper and polished layout of this lovely coffee table book to first look inside, it's one visual surprise after another, thanks to some stellar photography. Susie guides us through the planning of your big day beginning with finding your a color palette and wedding style. She describes seven different style weddings: classic, beach, contemporary, country, garden (her favorite and mine), fanciful (your own spin) and exotic. A bonus to this book is not only a pull out booklet offering a color palette for each wedding style, there's a quiz booklet, dress silhouette accordion pullout, six 8-page gatefolds full of photos, a CD of traditional wedding music, postcards, and, of course all that stunning photography.
I would have liked a lengthier section on fashion of course and more descriptions and detail about fabrics, silhouette, style, head chic and so on. However, the strong photography carries this book where words aren't necessary, leaving the bride open to getting in touch with her own muse. Using mostly real life brides and their weddings as examples in the photos, conveys reality at its finest. As you read along you'll realize, yes, with some coordination all this is possible. For me Style Your Dream Wedding will be a great reference tool and inspiration source for tons of upcoming posts. For you, it's a real gift for planning and realizing the most beautiful and unique wedding is indeed in the waiting. . . .
ALICE HART LOOKBOOK: COUTURE MILLINERY FOR THE NEW YEARS BRIDE
Lately some hats and headpieces have become an art form worthy of a place in a fashion museum. Alice Hart Couture Millinery of Vancouver, B.C. is right up there specializing in hats and some magnificent fascinators and cages. Her head wear caught my attention for the pure playfulness as well as originality.
Above the shoulder veils and headpieces like these are great for showing your gown to its best advantage.
Want to see more of Alice's work? Check out her site http://www.alicehart.com/. Also if you're more of a hat bride--oh la la! Definitely worth looking at the craftsmanship on her wide-brims and cocktail hats with feather varied treatments.
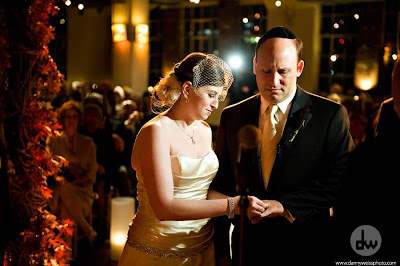
Real Weddings: Jen & Jason
Photographer: Danny Weiss
Location: New York City The Tribeca Rooftop
Makeup: Lo & Co.
Hair: Stacy Pitt
Location: New York City The Tribeca Rooftop
Makeup: Lo & Co.
Hair: Stacy Pitt
Real Weddings: Jen & Jason
Photographer: Danny Weiss
Location: New York City The Tribeca Rooftop
Makeup: Lo & Co.
Hair: Stacy Pitt
Location: New York City The Tribeca Rooftop
Makeup: Lo & Co.
Hair: Stacy Pitt
CLEAN LINED CHIC
If going clean and fluid is in your plans look for those simple flowing dresses in silk satin and chiffon with a few beaded details, maybe some ornamentation at the neck, waist or hemline.
Monique LhuillierThis is a bolero jacket by by Monique Lhuillier in satin organza with vertical ruffles.
Reem Acra
Strapless A-line gown with tulle overlay by Reem Acra
Reem Acra
Oscar de la Renta
The Greek Goddess lives in this white chiffon cape and ball gown by Oscar de la Renta
Oscar de la Renta
Lately the high fashion veil is going above the shoulder line, showing off easy and straight forward lines of the gown. Also fascinators or a cage veil like the one below can be fastened into beautiful hairstyling
source
Lately the high fashion veil is going above the shoulder line, showing off easy and straight forward lines of the gown. Also fascinators or a cage veil like the one below can be fastened into beautiful hairstyling
source
THE ART OF THE BODICE
Did you know the bodice is the focal point of your gown and reflects its overall style? Whichever kind you choose will determine whether or not your gown has sleeves, a collar, high or low neckline, lace overlays, etc. Proper fit from waist to neckline is essential and the place the most precise measurements need to be taken. Because a bodice is either darted or seamed, it typically has the most shaped and sculpted seams of any other piece on your gown. Also it's the center most piece that other components are attached and take form—the place your gown finally goes from flat to a three dimensional piece of fabric sculpture.
Atelier Aimée,
Atelier Aimée,
Kirstie Kelly
L’ezu Atelier
Amsale
Eden Bridals
Demetrios
Lazaro
birnbaum and bullock
Justina McCaffrey
While a bodice may look pretty straight-forward from the outside, like the skirt, it may have a complex inner life of linings, facings, and shaping materials we never see but sense by the way the bodice holds it’s shape. The bodice on a typical wedding gown needs an underlining to give it that sculpted form in addition to becoming a strong foundation with which to attach lace, trim or embroidery. Also, an underlining can hide casements within the bodice for boning, a material used to hold that strapless bodice up. We’ll discuss the under structure of your bodice as well as skirt in more detail later. Until then realize most bodices whether draped or closely fitted to your body, frequently have some kind of foundation of reinforcement beneath. Here are a few bodice treatments to consider
Subscribe to:
Posts (Atom)